


 Today I am sharing a cake topper anyone can make – even those without a paper cutting machine!
Supplies:
- 4 colors of your choosing
- Xacto Blade
- Skewer or Lollipop Stick (found at Michaels in the cake aisle)
- Tweezers or Quilling Tool (optional)
- Hot glue gun
- 3D foam dots or double-sided foam tape
- Find a picture of a very simple rainbow by searching “rainbow clipart” on Google.
Something like this or even more simple (like mine) will work great.
2. Print the rainbow to your desired size. For this example, I used a 6″ rainbow.
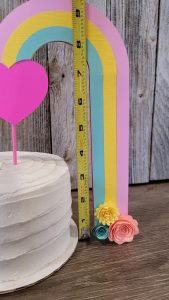 3. Trace the outline of the whole rainbow on a colored piece of cardstock. Instead of closing off the bottom, though, extend the rows down on one side. You can use a ruler here to get straight lines. For mine, I extended them by 7″. Keep in mind that my cake prop is only 3-4″ tall so this step will depend on how tall your cake is. I’d recommend adding 3-4″ in length to the height of your cake. For example, if your cake is 6″ tall, extend your rainbow rows to 9-10″.
4. Trace each row onto a sheet of colored paper.
5. Cut out each color. You’ll want 1 layer containing all the rows (mine is hot pink). This is the perfect place to include a heart like mine as well.
6. Use the foam dots/ foam adhesive tape to attach the rainbow rows to your back piece.
7. Attach your cake stick using hot glue.
8. Optional: Google search for a “Rolled Flower.” Any pattern will work! Print 3 copies about 2-3″ wide. Cut out the rolled flower. Trace the pattern onto your colored paper and cut it out. 
9. Using your tweezers or quilling tool, roll the flower around itself starting from the outside. Apply a generous amount of hot glue to the center circle. Release your rolled flower so that it opens up a bit and gently press it down into the glue.


